

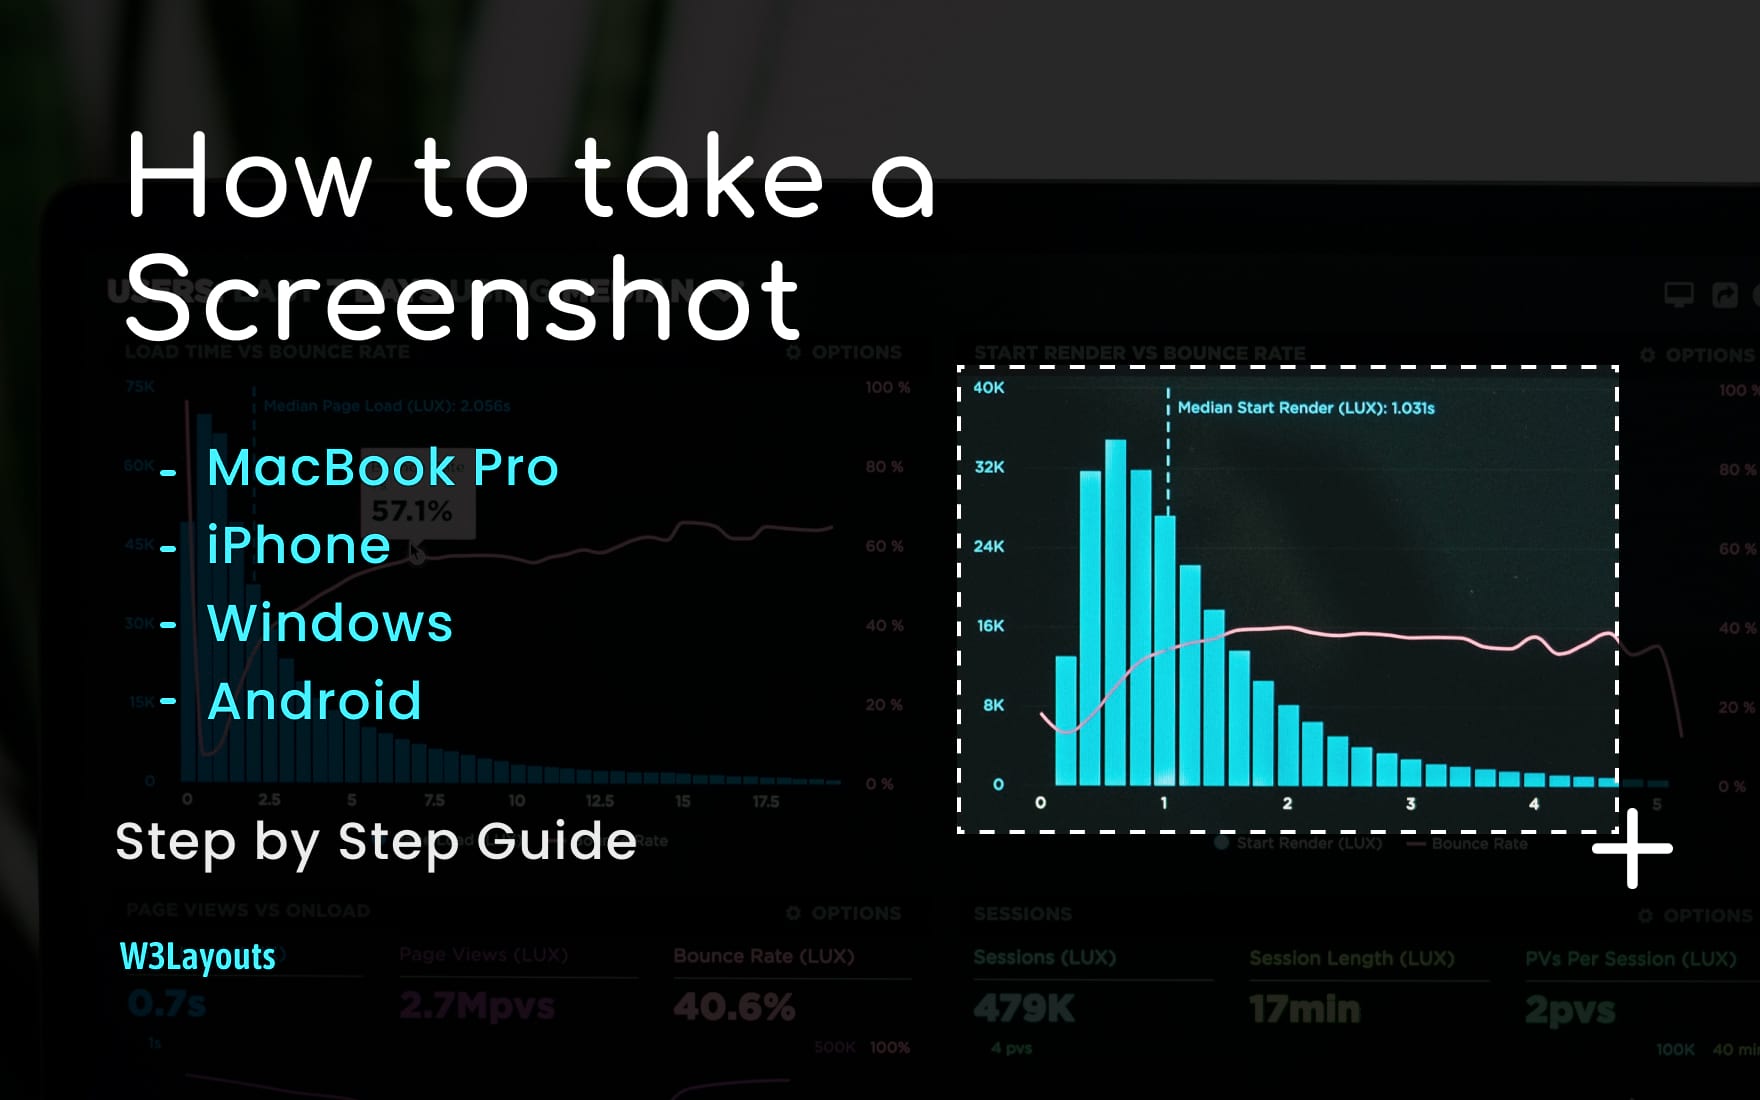
If you are new to your gadget and looking for an answer to the question “How to take a screenshot”, Don’t worry. This article will be your guide. As you are reading this article, you can simultaneously follow the steps and take screenshots as given in this article.
Taking a screenshot in any gadget is one excellent feature. Today, almost every gadget with a screen and working on Windows, Android or Mac has this feature. With a screenshot, data sharing becomes as easy as cutting a cake. You press and hold a combination of keys on your keyboard and within a second the whole screen or a part of it is captured. When you are working on a design or a code and want to immediately send a picture of it to your client, the screenshot feature comes handy.
Every operating system has a different method of taking a screenshot. This article discusses the most popular ways of taking a screenshot on Mac, Windows and Android devices. The steps given in the article are super easy to read and implement. It also has a pictorial demonstration of the keyboards highlighting the keys to be used so that there is no confusion in your minds.
Before delving into the article, the links below will help you jump to the specific section OS by clicking them.
- Screen capture on Macbook Mac OS
- Screen capture on IOS
- Screen capture on Windows
- Screen capture on Android
How to screenshot on Macbook
Mac has always been successful in grabbing the eyeballs of the gadget freaks around the world due to its amazing features. Being innovative is at the core of Apple, and the same ideology goes with the Mac.
There are six ways to capture a screen in Mac.
After the screenshot is taken, it can either be saved on your desktop or on the clipboard so that you can paste it in your document or a message being sent to your client.
So, here we go,
1.Taking a screenshot of the whole screen and saving it on your desktop
Keys to be used – Shift + Command + 3
If you want to take a screenshot of your whole screen and save it on your desktop, then press and hold these three keys for a second.
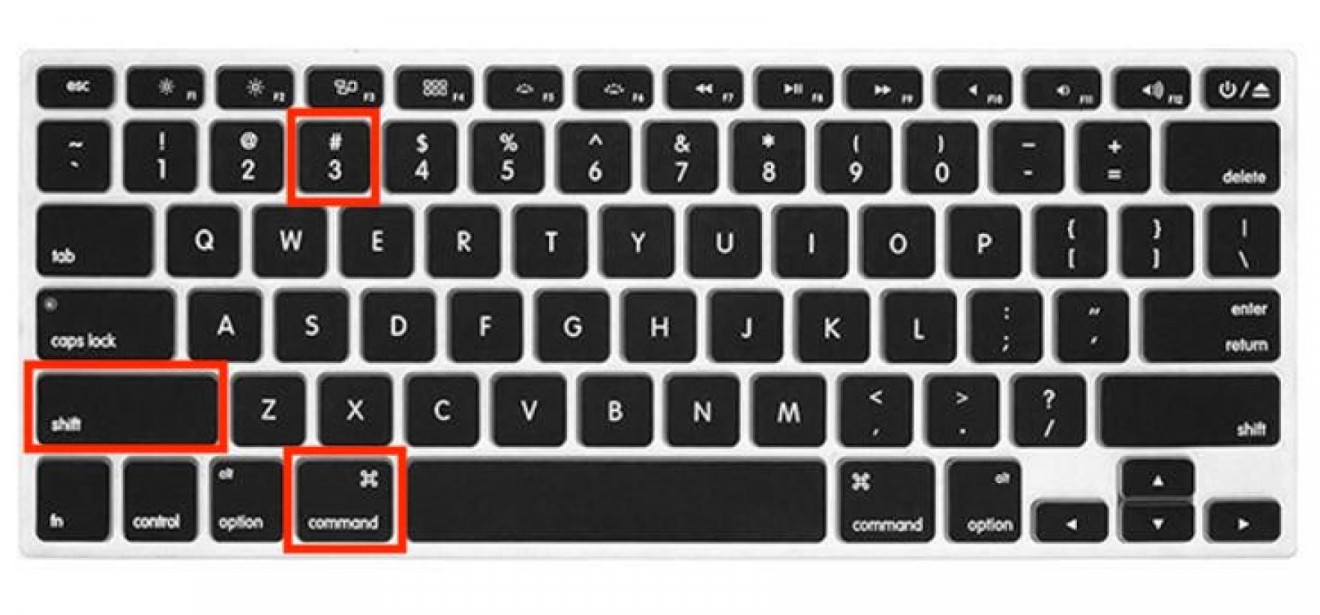
You will hear a ‘camera click’ sound (if sound is enabled) and the screenshot will automatically be saved on your desktop.
A thumbnail of your screenshot will be seen at the right bottom corner of your screen.
You can click on the thumbnail to see the screenshot captured.
The previewer also has some great editing tools if you wish to add markings or text on the image.

If the image is not satisfactory, you can always delete using the ‘bin’ button one the right end.
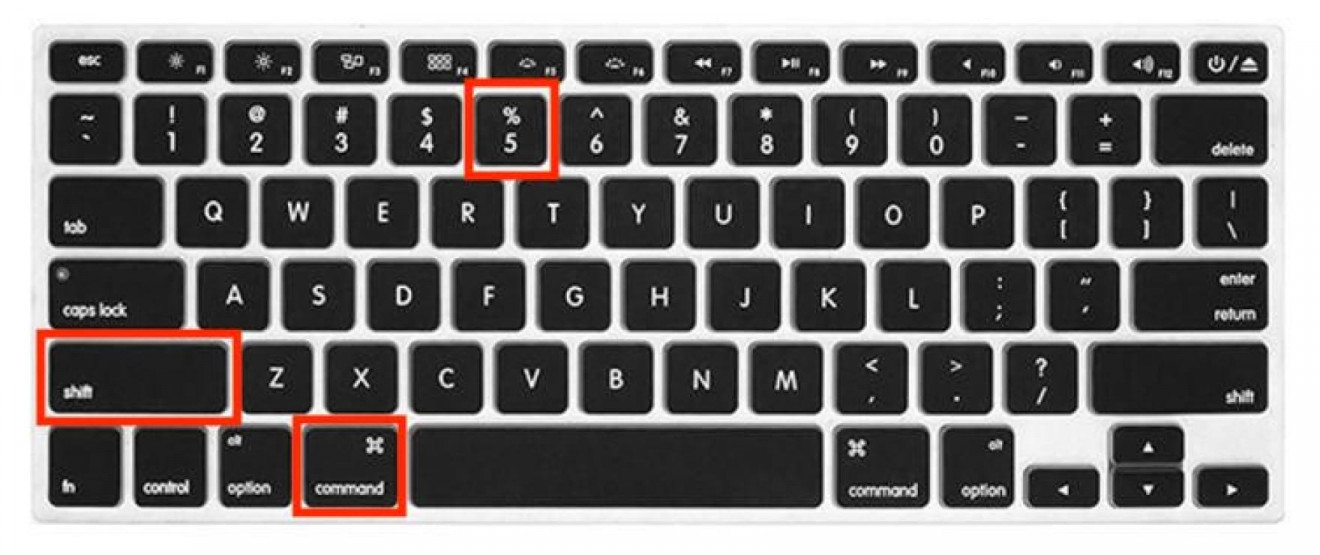
2.Taking a screenshot of the whole screen and saving it on your clipboard.
Keys to be used – Shift + Command + Control + 3
If you want to take a screenshot of your whole screen and save it in clipboard, then press and hold these three keys for a second.
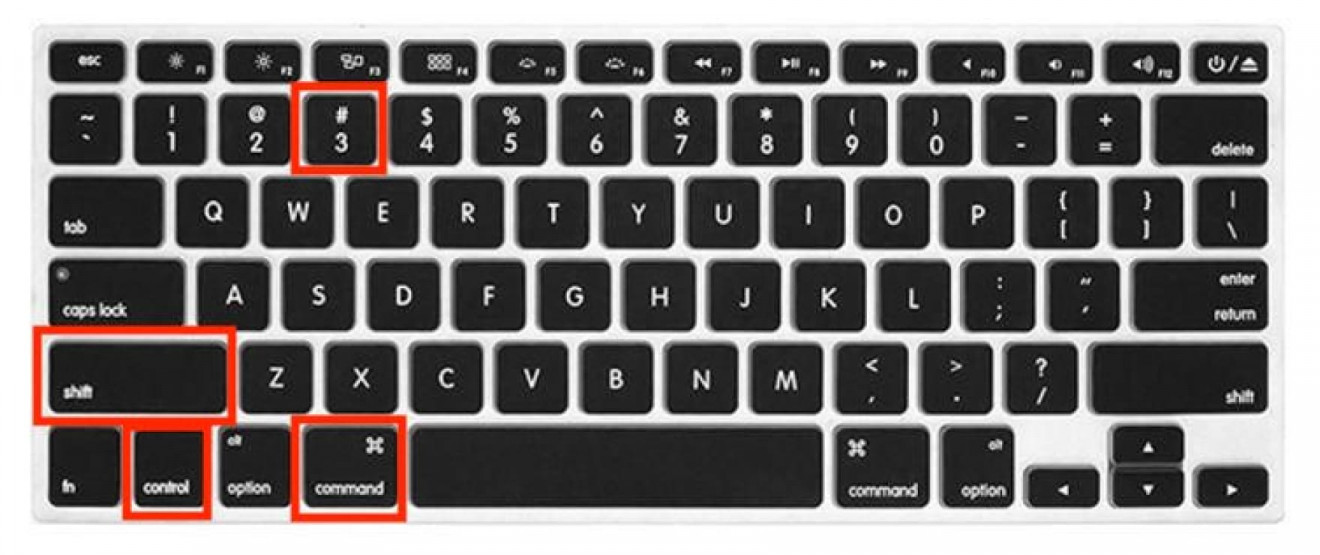
You will hear a ‘camera click’ sound (if sound is enabled) and the screenshot will be automatically saved in the clipboard.
You can then paste it by using Command + V in any application you are working on. You can either send it as a message to your clients or paste it in PowerPoint or word.
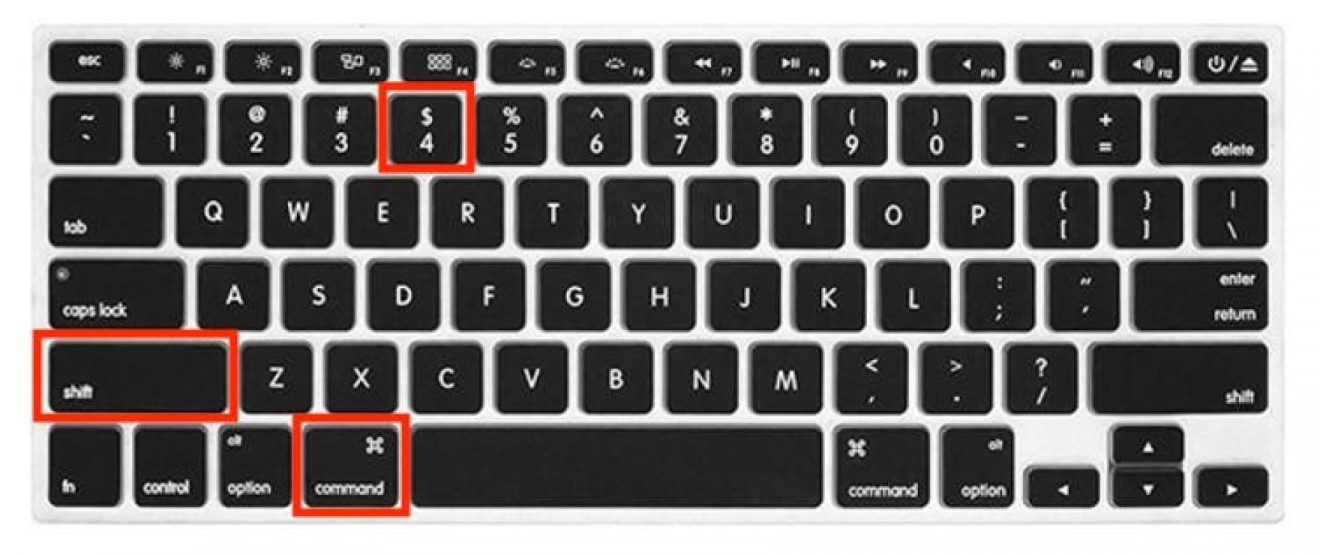
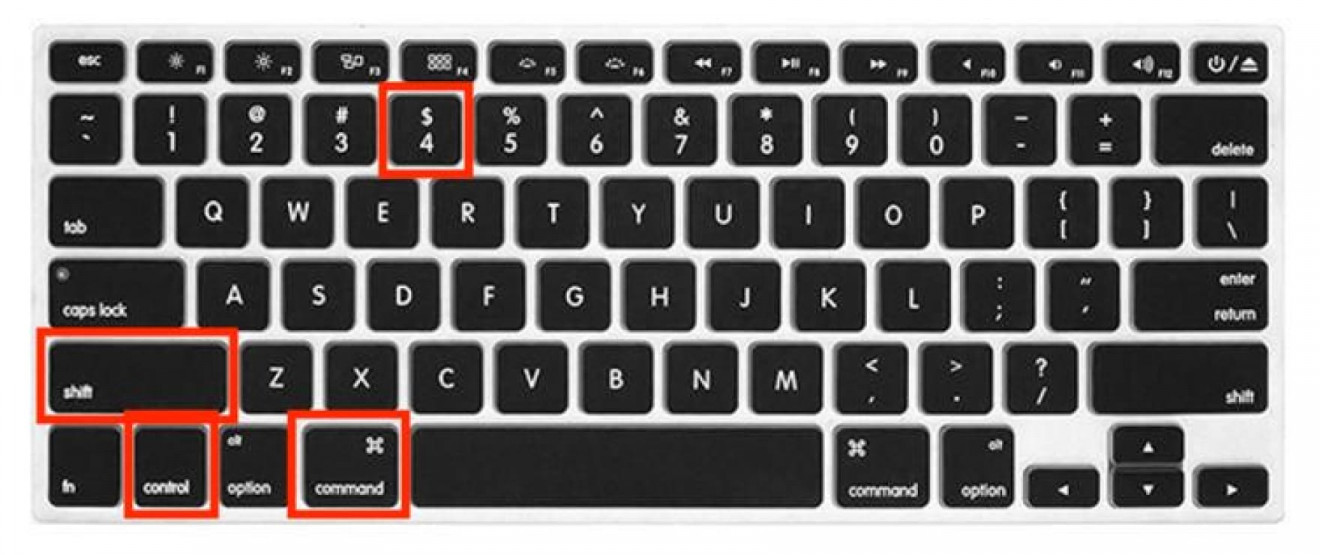
3.Taking a screenshot of a selected portion and save it on your desktop
Keys to be used – Shift + Command + 4
Using this combination of keys, you can capture a portion of your screen and save it on your desktop. A marker will be displayed which you can drag across the screen using the trackpad to select a portion.
After you are done selecting the portion, you will hear a ‘camera click’ sound (if sound is enabled) and the screenshot will be automatically saved on your desktop.
A thumbnail of your screenshot will be seen at the right bottom corner of your screen.
You can click on the thumbnail to see the screenshot captured.
The previewer also has some great editing tools (as shown earlier) if you wish to add markings or text on the image.
If the image is not satisfactory, you can also delete it by using a button at the top right corner.
4.Taking a screenshot of a selected portion and save it on the clipboard
Keys to be used – Shift + Command + Control + 4
Using this combination of keys, you can capture a portion of your screen and save it on the clipboard. A marker will be displayed which you can drag across the screen using the trackpad to select a portion.
After you are done selecting the portion, you will hear a ‘camera click’ sound (if sound is enabled) and the screenshot will be automatically saved on your clipboard.
You can then paste it by using Command + V in any application you are working on. You can either send it as a message to your clients or paste it in PowerPoint or word.
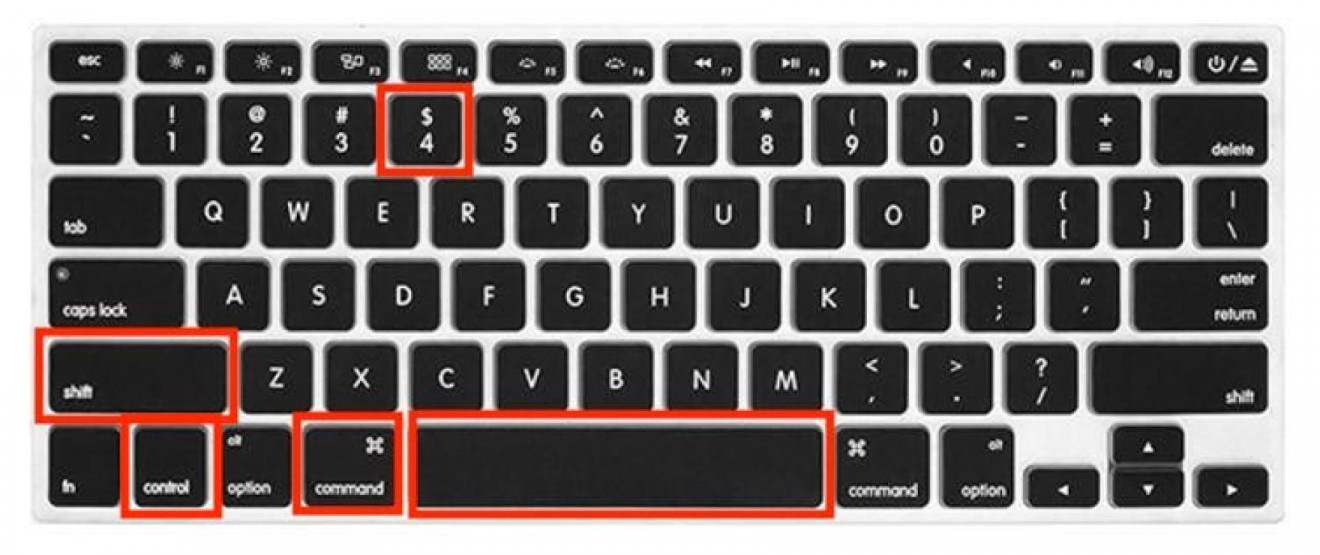
5.Taking a screenshot of a specific window and save it on your desktop.
Keys to be used – Shift + Command + 4 + Spacebar
Using this combination of keys, you can capture a specific window and save it on your desktop. A camera icon will appear on the screen and it will highlight the windows on hovering.

After selecting the window, you will hear a ‘camera click’ sound (if sound is enabled) and the screenshot will be automatically saved on your desktop.
A thumbnail of your screenshot will be seen at the right bottom corner of your screen.
You can click on the thumbnail to see the screenshot captured.
The previewer also has some great editing tools (as shown earlier) if you wish to add markings or text on the image.
If the image is not satisfactory, you can also delete it by using a button at the top right corner.
6.Taking a screenshot of a specific window and save it on your desktop.
Keys to be used – Control + Shift + Command + 4 + Spacebar
Using this combination of keys, you can capture a specific window and save it on your desktop. A camera icon will appear on the screen and it will highlight the windows on hovering.
After selecting the window, you will hear a ‘camera click’ sound (if sound is enabled) and the screenshot will be saved in your clipboard.
You can then paste it by using Command + V in any application you are working on. You can either send it as a message to your clients or paste it in PowerPoint or word.
7.All Options in One
Keys to be used – Command + Shift + 5
Using this combination of keys, all the options mentioned above can be accessed at once.
After you press and hold the keys, you will get a menu as shown in the picture below.

The menu shows different options for capturing the screenshots. There are also options for recording the screen as a video.
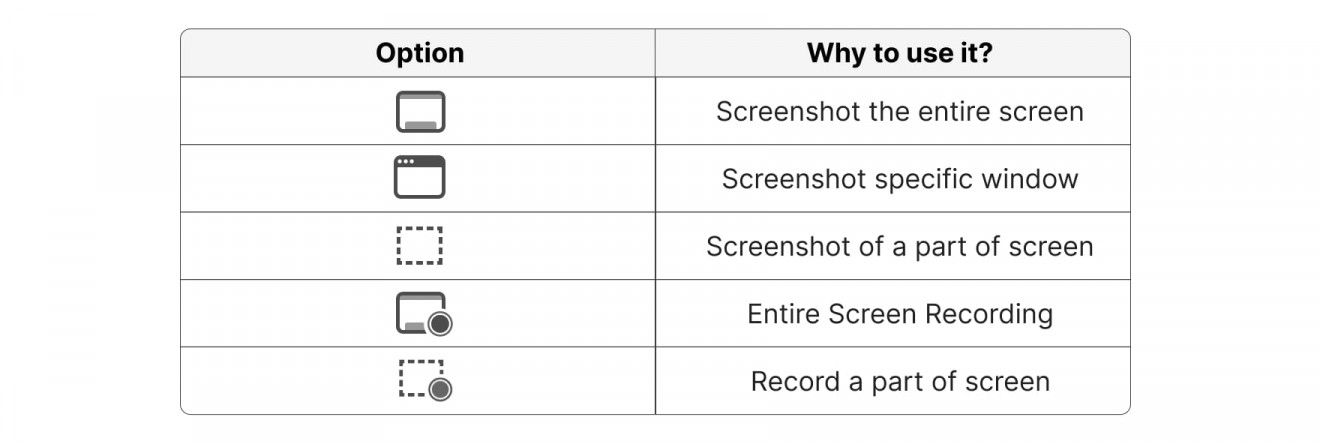
If you click the ‘Options’ you can see multiple options of saving the screenshot.
So, these are the possible ways of taking a screenshot or recording a screen in a MacBook.
How to screenshot on iPhone
Taking a screenshot on your iPhone makes everything so easy. If you see an image or a meme on social media, downloading it takes many steps. A screenshot will take only a couple of seconds to capture. The feature also helps you to save and send pictures of your chats, take a screenshot of a page and doodle on it or crop the screenshot as required.
The design of the iPhone has changed over the years. The older iPhones (5 and SE) had a top button. Then came iPhone 6,7 and 8 with a side button. From iPhone X onwards, Apple has ditched the home button which was used to take screenshots in the earlier versions.
- Taking a screenshot on an iPhone is all about pressing two buttons at the same time. The combination of buttons to be pressed depends on the version.
- The table shows the buttons to be used based on the type of iPhone.
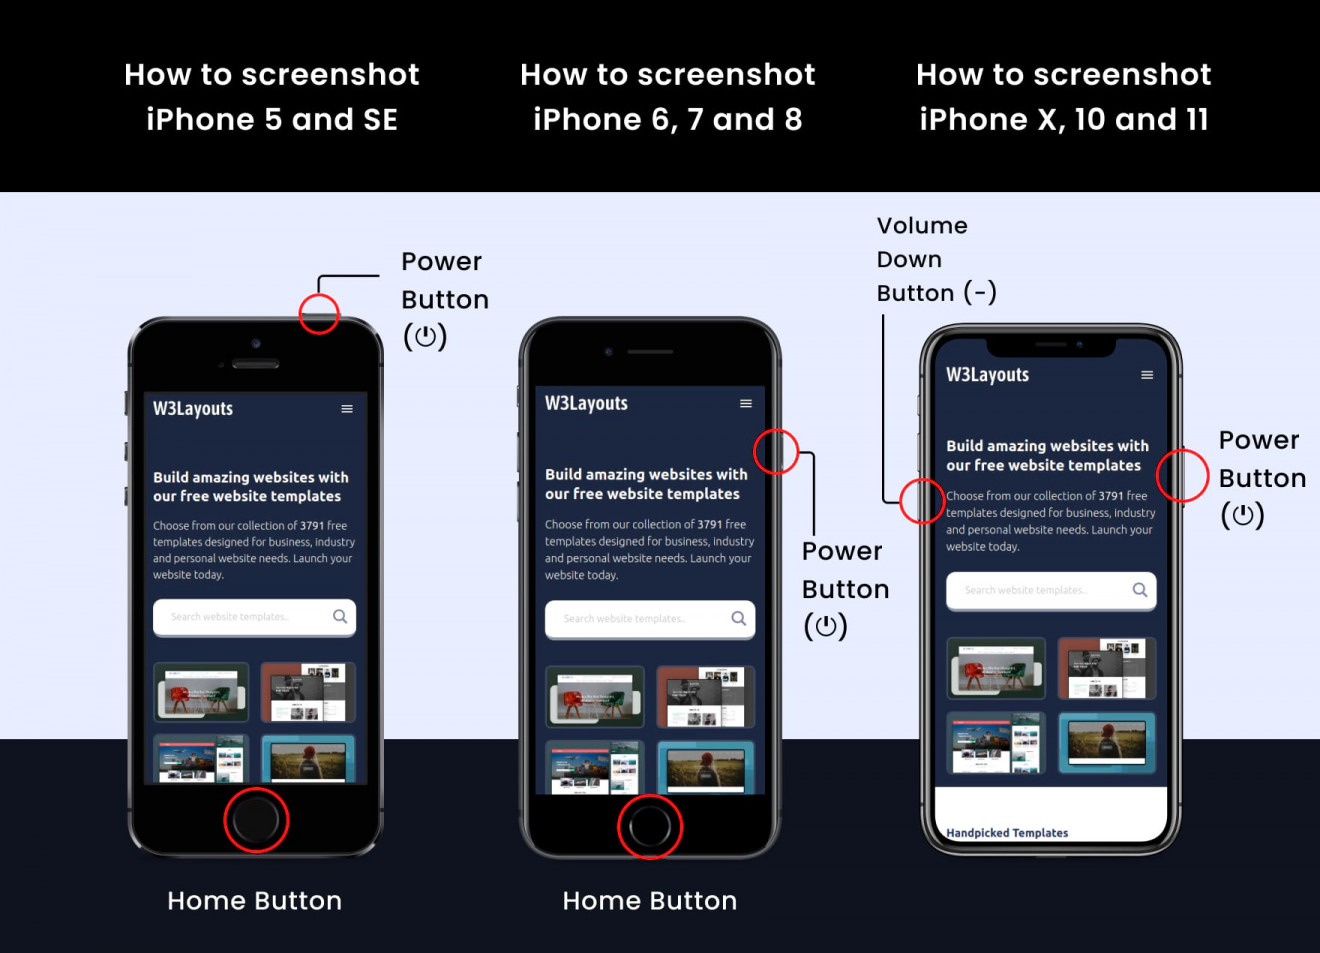
- After the screen is captured, you will listen to a camera click sound (if the sound is enabled), you may then immediately both the buttons.
- You will see the thumbnail of the captured screen at the bottom right portion of the screen.
- You can either touch on it to check or instantly delete it by swiping left.
To find the screenshots, navigate Photos –> Albums –> Screenshots
How to screenshot on Windows Desktop
One way of taking a screenshot on a Windows PC is the most common. That is, hit the PrtSc button –> Open Microsoft Paint –> Ctrl + V. (if you are not aware of this, don’t worry. This is Method No. 1 we have explained below)
But, this is not the only way of taking a screenshot in Windows. There are 7 other ways of taking a screenshot on Windows. We will take you through them in the following part of the article.
Windows is the most popular operating system in the world. In 2017, Apple revealed a data that Windows is four times more userbase than their iOs with more than 400 million users.
If you are a Windows user, you come under a large bracket of PC users. And, like many, even you must be having doubts about capturing the screen. This portion of the article will clear all your doubts.
Apart from keyboard shortcuts, like we saw in the case of Macbook, Windows also has additional inbuilt tools to achieve the same. There are two tools that you can use.
- Snip and Sketch
- Game Bar
We will see these in the further part of this article. But, first, let us look at some keyboard shortcuts to take quick snaps of your windows screen.
Keyboard shortcuts to capture the screen
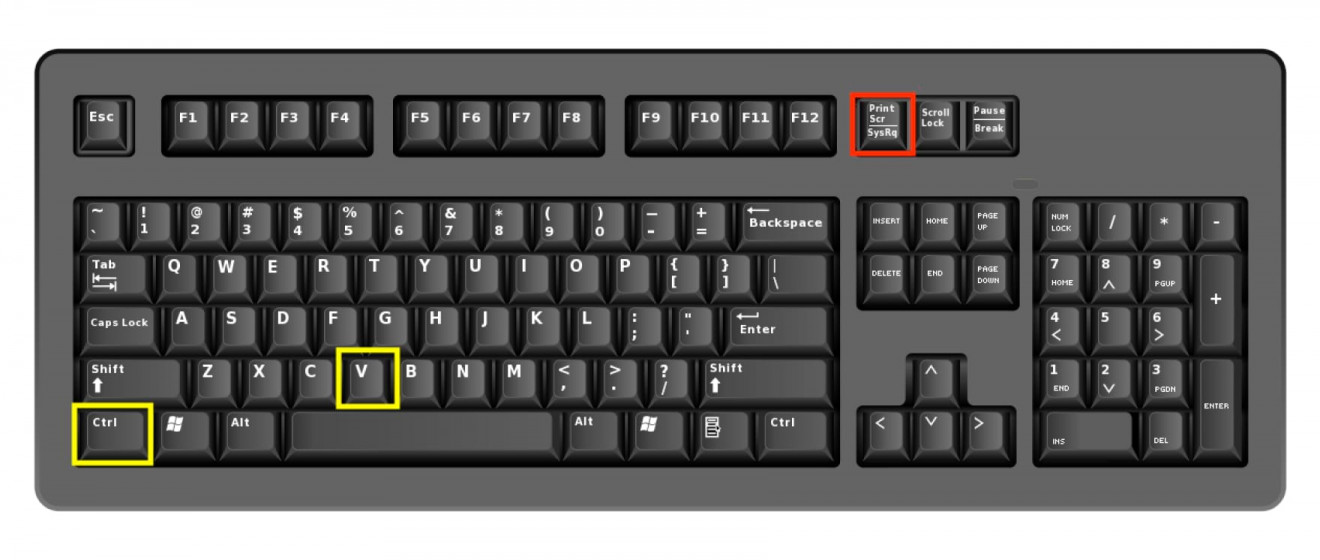
1.Taking a screenshot of the entire screen and saving it on the clipboard
This is the most popular method of taking a screenshot for a windows PC or laptop. Here are the steps to capture the screen.
- Tap Print Scr. Your image will be saved in the clipboard.
- Open any image editor (like Paint) and paste the image using Ctrl + V.
- You can either save the image as it is or edit it before saving.
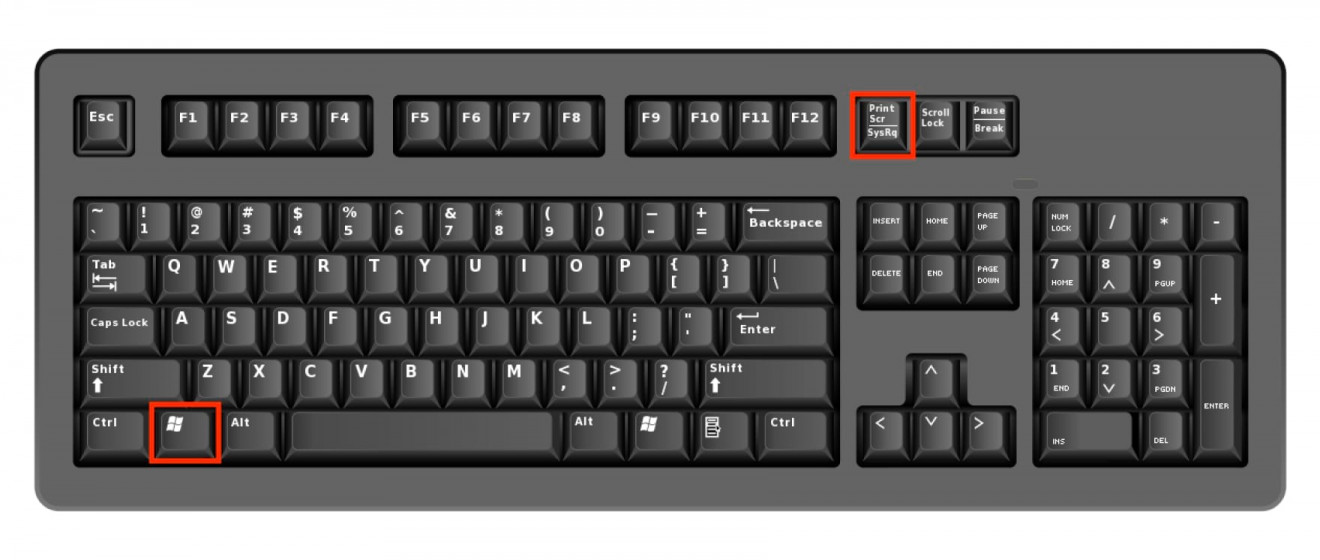
2.Taking a screenshot of the whole screen and saving it as a file
If you want to save the captured screenshot as a file to use it later, this method will make it easy.
Here are the steps,
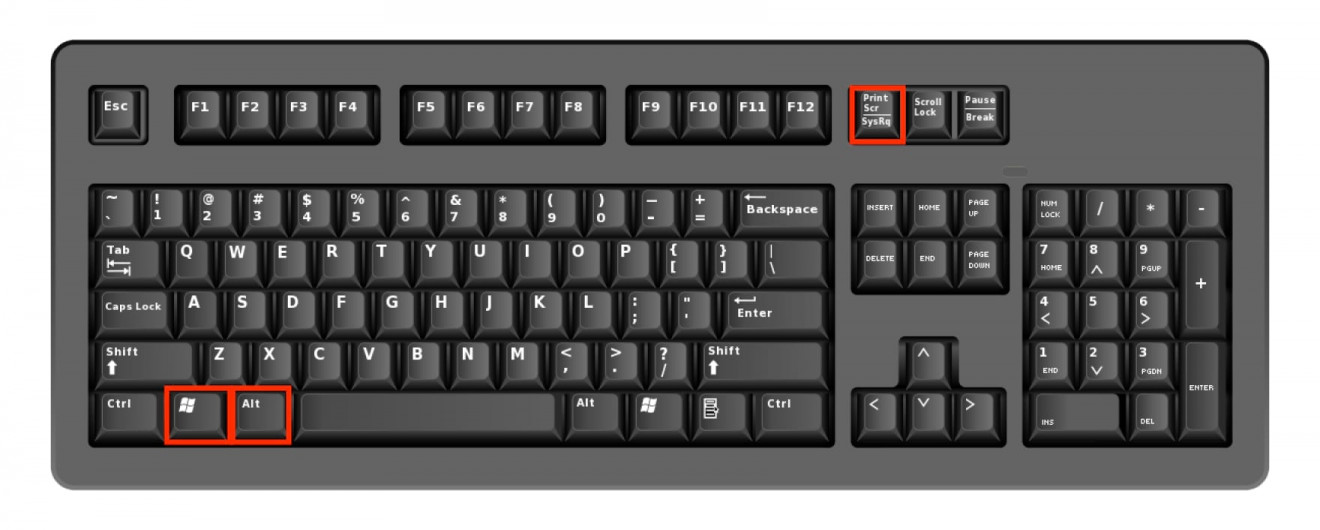
- Tap Windows and Print Scr together. Your screen will turn dim for a moment.
- You can check out the image in Pictures –> Screenshots folder.
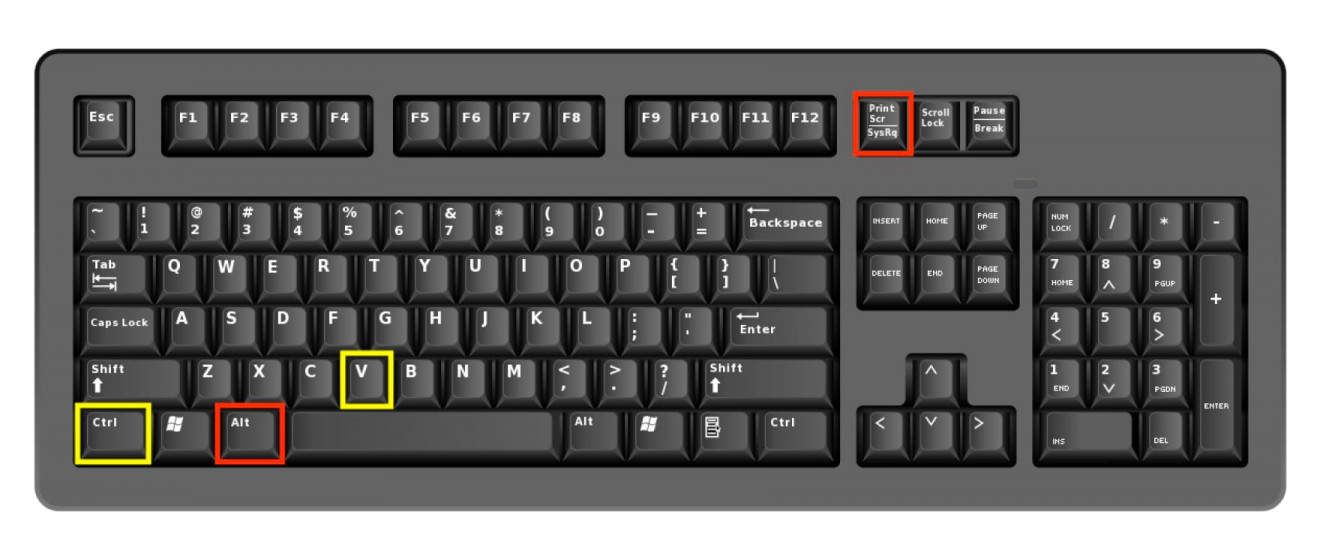
3.Taking a screenshot of an active window and saving it on the clipboard
The earlier two methods mentioned enable you to capture the entire screen. But if you have multiple windows opened want to capture the active window, then follow these steps,
- Make sure that the window you want to take screenshot of is active. If not, click on the window.
- Tap Alt and Print Scr together. The captured image will be saved in the clipboard.
- Open any image editor (like Paint) and paste the picture using Ctrl + V.
These are the three techniques of taking screenshots using the keyboard. If you want to crop a screenshot, you need an image editor.
But if you want to capture and crop in just one step and save the screenshot, you can use Snip and Sketch Tool.
How to use Snip and Sketch Tool
Snip and Sketch tool allows us to take screenshots, annotate them and even crop them all in one go.
Here are the steps to do all of that,
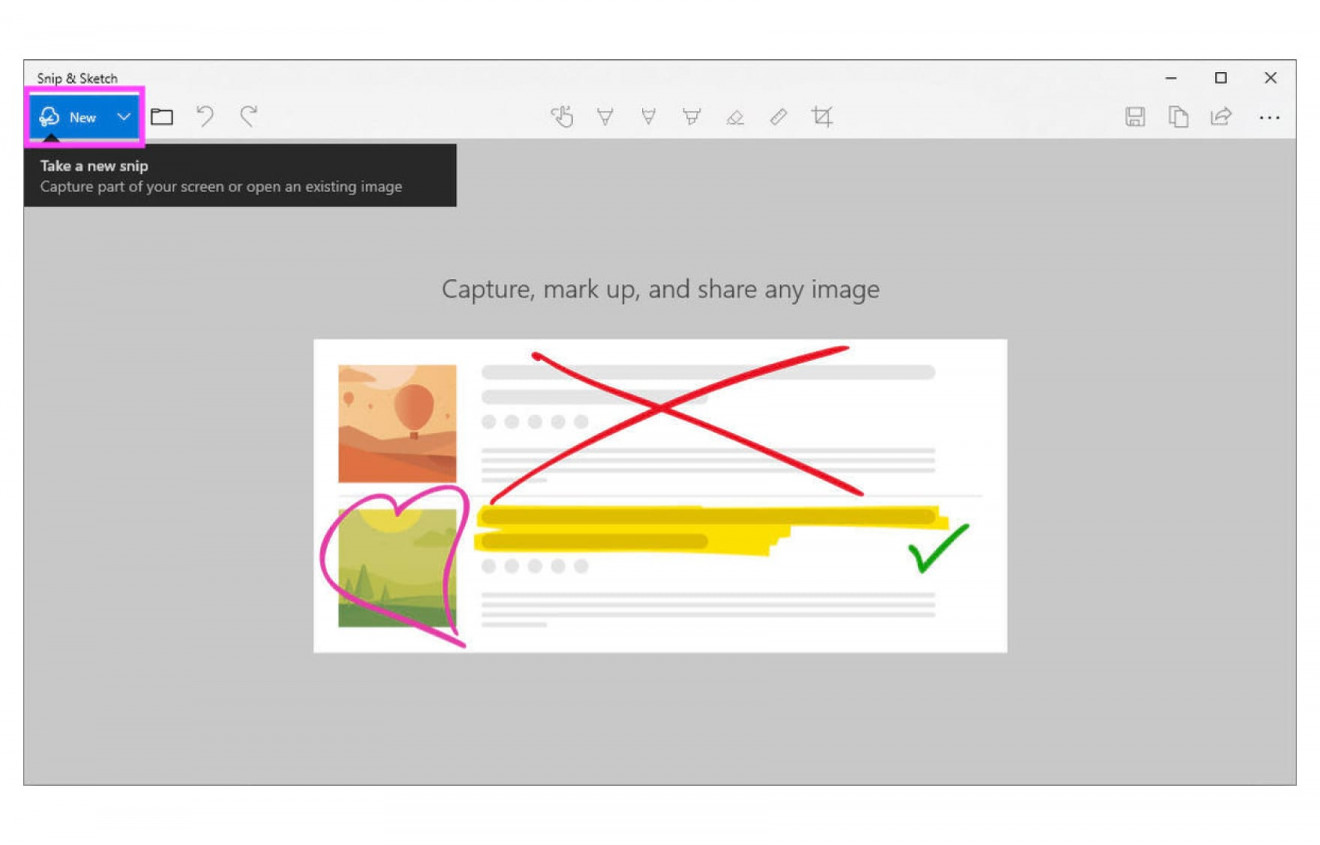
1.Open Snip and Sketch tool
Click Start
Search for Snip and Sketch. Click on the top result to open the tool
You will this window.
(Note – You can also press Windows Key + Shift + S to open the tool)
2.Click New (highlighted in the picture above).
The screen will go dim and you will see this window.
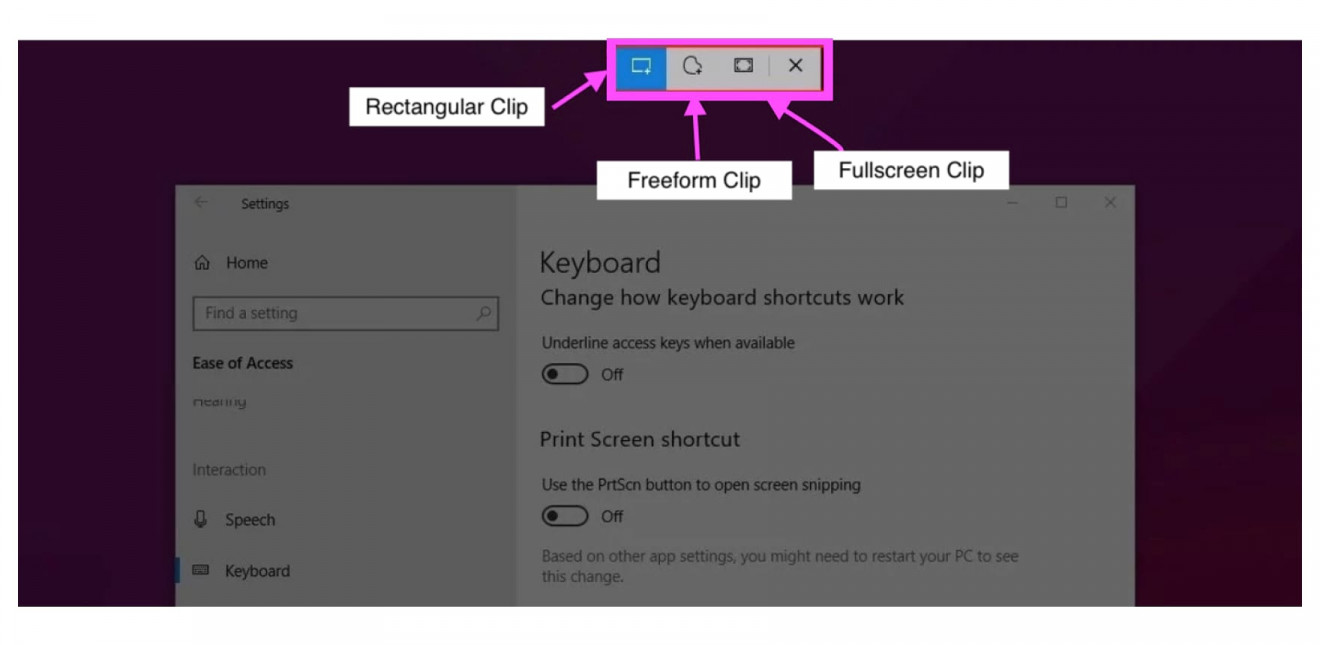
3.Select the type of screenshot you want to take
The highlighted box gives you three options to take the screenshot.
- Rectangular Clip – Capture any rectangular portion of the area.
- Freeform Clip – Capture selected area of any shape.
- Fullscreen Clip – Capture the entire screen.
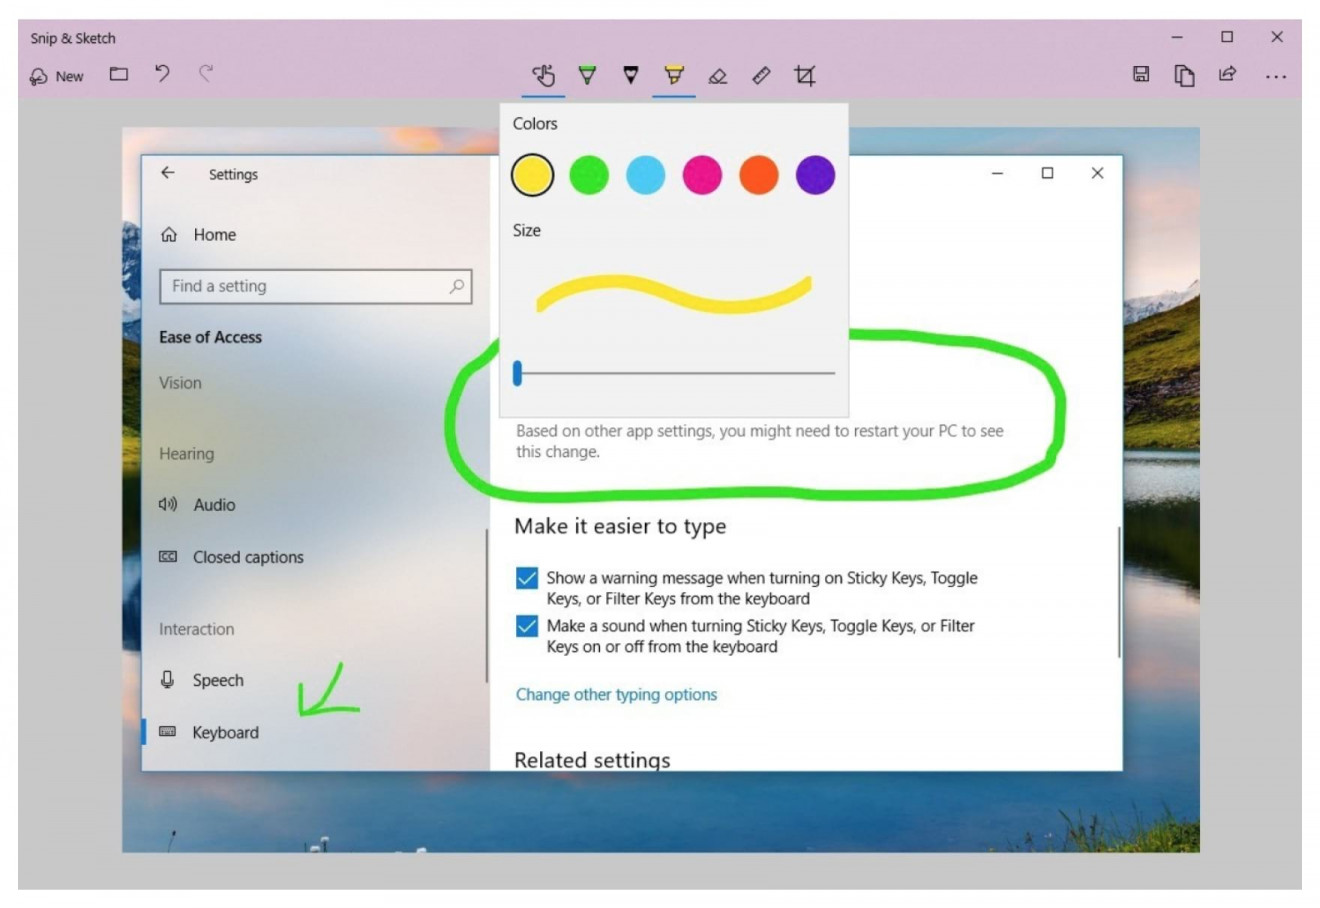
After you take a screenshot, you will be taken back to the sketch and snip window, where you can add markings to the image.
You can also open the snip and sketch tool by using the print screen button
How to use Game Bar feature in Windows 10
If you wish to take screenshots of those aww inspiring moments from your video game, you must check out the ‘Game Bar’ feature.
To activate the feature, you only need to tap Windows and G keys. You will find a Game bar at the bottom of the screen, as shown in the picture below.

You can then either click on the ‘camera’ button to capture the screen or make use of a keyboard shortcut Windows + Alt + Print Scr.
You can change the combination of keys according to preference in Settings –> Gaming –> Game Bar.
You can also record an onscreen video by clicking the red circle.
All the screenshots and recorded videos will be saved in Settings –> Gaming –> Captures
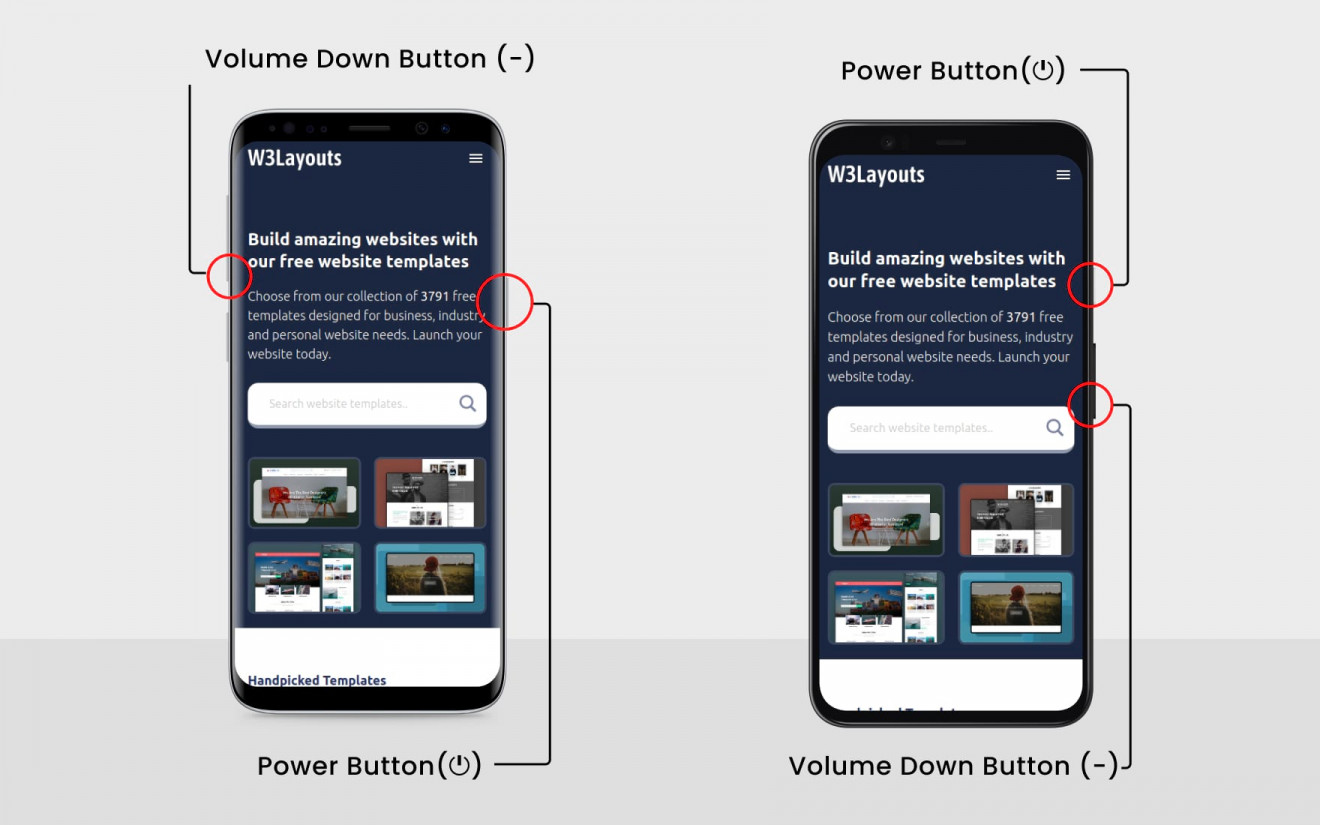
How to screenshot on Android Smartphones
Just like the iPhone, you can also take a screenshot on your android smartphone. With so many android phones in the market, you may think that every phone has a different method to take a screenshot. But, it’s not that confusing. The basic steps to follow almost remain the same for every android phone.
Generally, there can be two ways,
- Hold the power button for a few seconds and tap on the screen.
- Hold the power and volume down button till you hear a ‘click’ sound.
After you have taken the screenshot, you can view and edit by navigating the photos folder of your phone.
In recent updates, the screenshot appears on the lower right or upper right portion of the screen for a few seconds. You can tap on it to instantly edit and share.
And that’s a wrap!
So, these are different ways of taking a screenshot in your Macbook, iPhone, Windows, and Android smartphones. Using these shortcuts cuts a lot of time and effort.
Hope this guide has helped you.